This easy girls dress sewing tutorial includes written and video instructions. It has all the measurements for making this, for any size from 2T to a girls 10.
This post contains affiliate links. See my full disclosure here.
Easy Girls Dress Sewing Tutorial Video
Shop the fabrics
Mustard Polka Dot
Floral Fabric
Pink Polka Dot
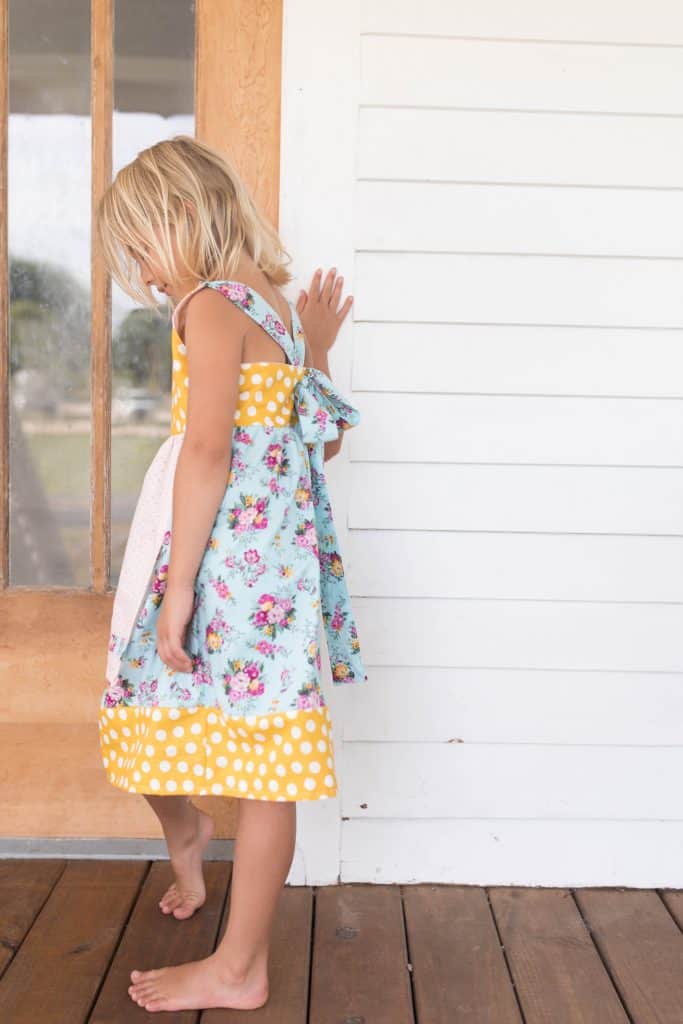
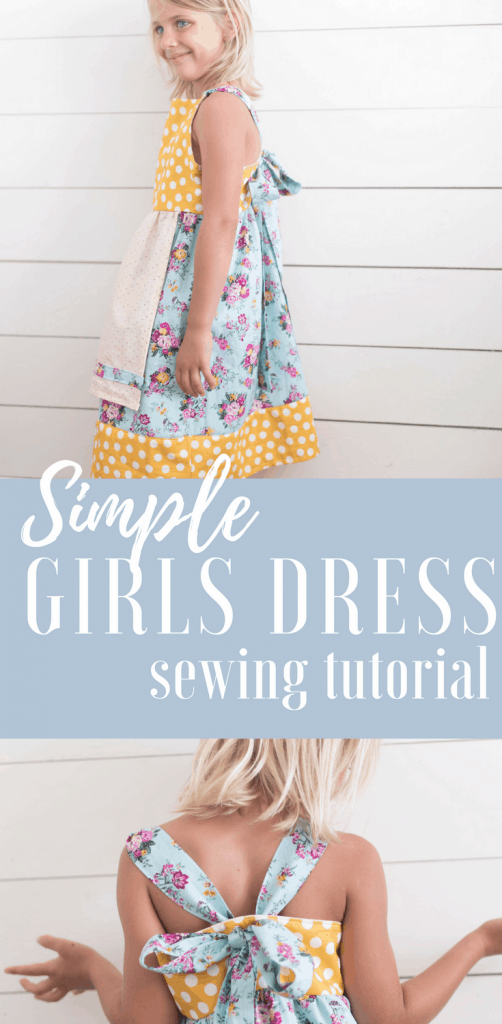
This dress is simple to make, even for beginners. It looks cute in the original length and also a little shorter with leggings, as your daughter grows. I have one I made for my daughter when she was 5 that she still wears now at age seven.
I’ve included precise cutting instructions for size 2T, 3T, 4T, 5T, 6, 7 and 8/10.
It’s even fun to make this dress coordinating for sisters. When my girls were little I would pick out three or four fabrics, and then mix them up to make the girls dresses coordinating, but not an exact match. One girl would have the pink fabric in the straps and the other in the bodice, or with the patterns mixed up in some other way.
My oldest son got roped into this one with a matching tie:

They don’t really appreciate matching so much anymore.
My love of sewing dates way back to when I was a kid making little pin cushions for my grandma, with scrap fabric. In high school I wore skirts made from old blue jeans, with the names of my favorite bands stitched in the waist band. I remember designing outfits in my head, when I was supposed to be paying attention to history lectures.
In college, I was hooked on Project Runway. (Confession. I still love that show.)
Point is. Sewing and designing has interested me for a long time.
But nothing could prepare me for the intense sewing obsession that comes with having a baby girl.
The only thing that can fuel the sewing fire more than having one baby girl is having 2. in a row. in less than 2 years.
My sewing obsession
It started with some basic Oliver + S patterns that my mom helped me work through. Up until this point, I had only ever sewed little items that I just made up. No patterns or anything official.
Once I understood basic dress construction…Make a top, make a skirt, add some straps and make sure there is some kind of way to get into it ie. buttons, elastic, stretchy fabric, etc. All I wanted was to just lock myself in my sewing room and do some serious making.
I wanted more. I wanted ruffles, and patterns and COLOR. So much color.
Most of all, I just wanted the freedom to play around with fabric and make something with my own creativity.
There are so many possibilities! For a while I was making so many dresses, that I actually opened an Etsy shop to sell off some of them. Little girls only need so many dresses in their closets.
It was a fun place to really play around with different fabrics and designs. I added ruffles, pleats, fabric rosettes, eyelet, buttons and shirring. A couple of the dresses were made from old curtain fabric. I didn’t really know what I was doing but I was having an absolute blast.
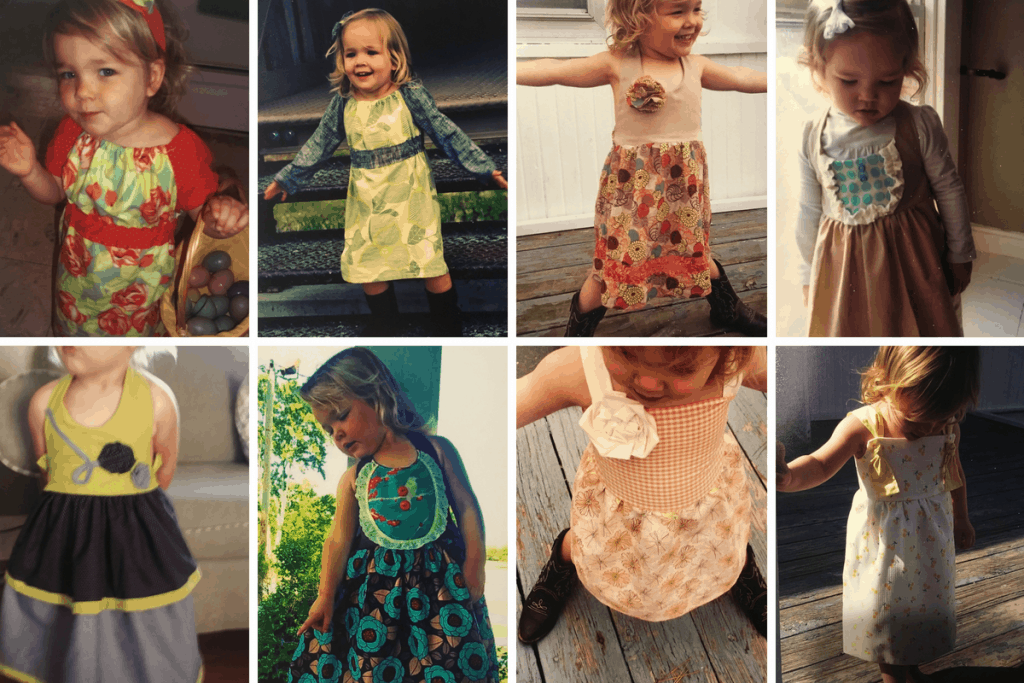
Clearly photography was not yet an interest I was pursuing. Bwahaha.
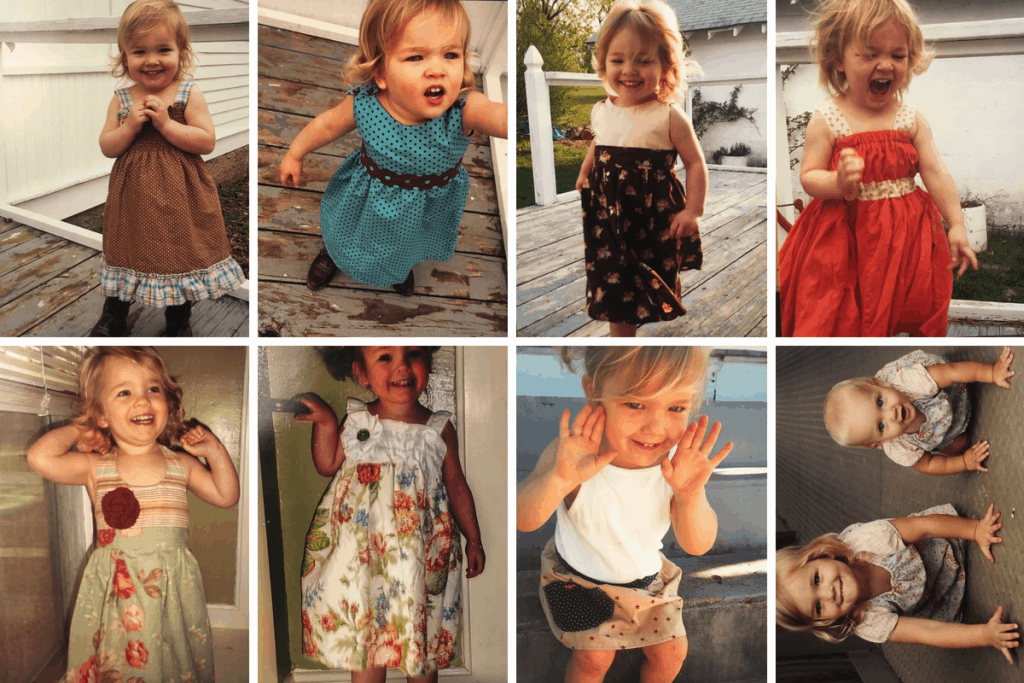
To me sewing is just so much fun when you break all the rules and just make stuff. I used dresses the girls already had to figure out what length and width they should be. Other than that, I just let my imagination run wild.
This is what I did when I showed you how to create a few items in these posts:
Pajama Sets from Vintage Sheets
Over the years my skills have improved with a lot of trial and error, and the end results are a little more polished.
The point of all this walking down memory lane, to when my almost 10 year old was 2 (insert crying emoji), is to just encourage you that sewing is FUN. There are no rules to follow, and no need to stick to rigid patterns. Add that extra ruffle. Pair stripes and polka dots. Use unconventional fabrics, like table cloths and sheets. It doesn’t have to be perfect to be beautiful.
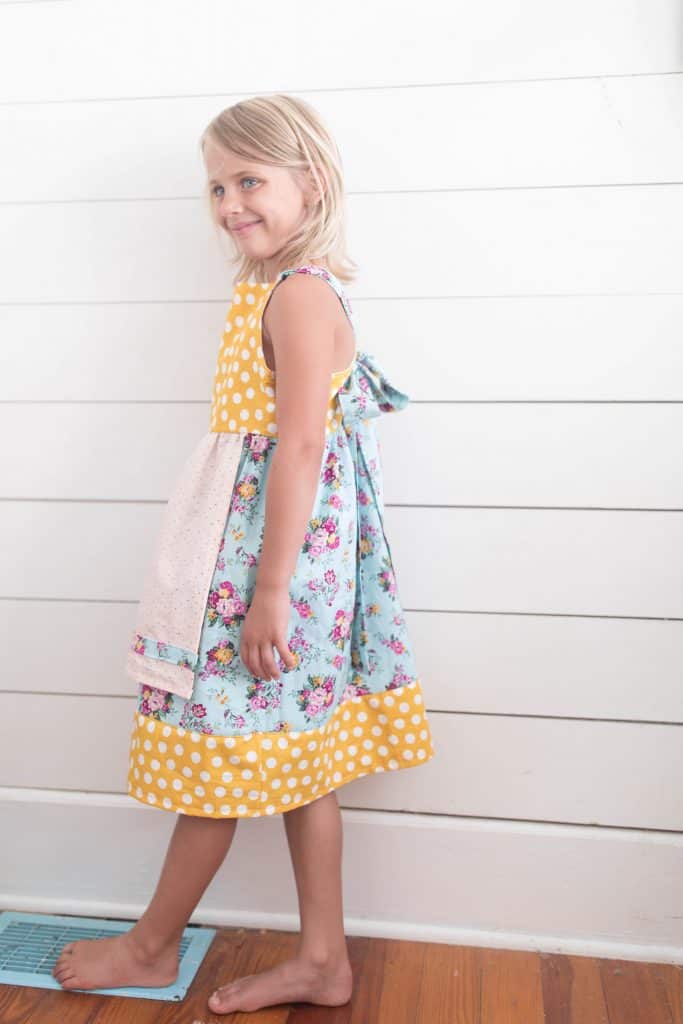
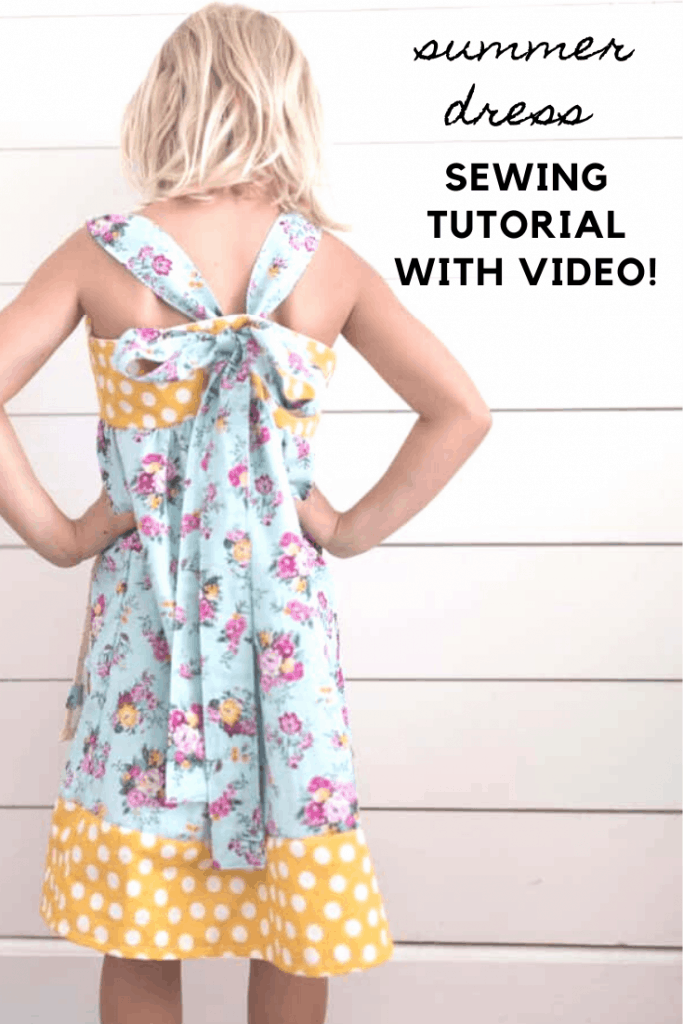
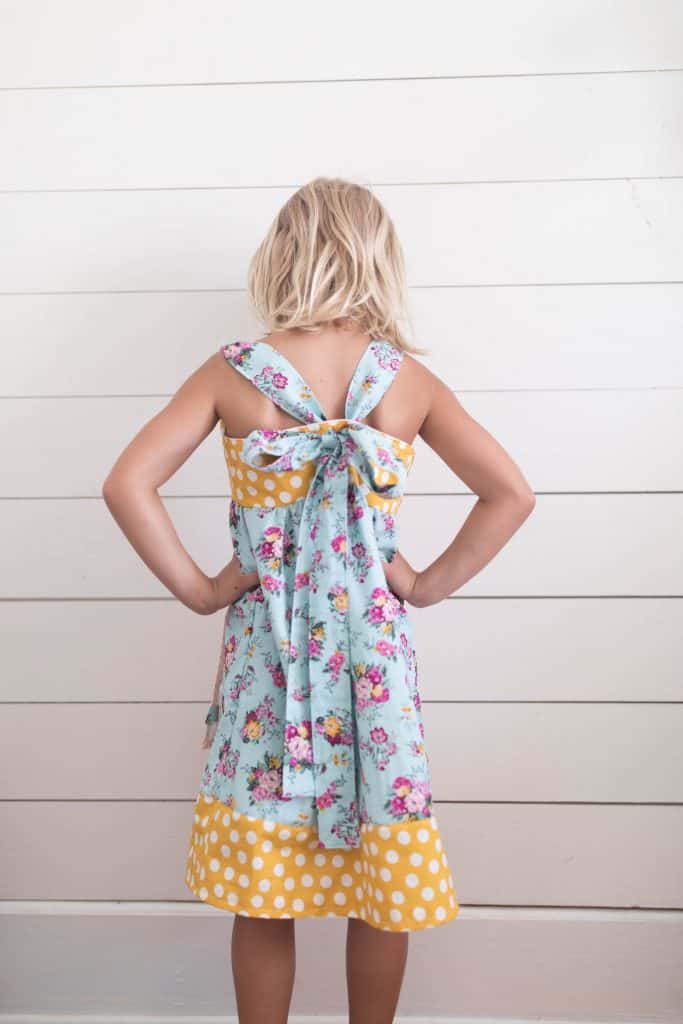
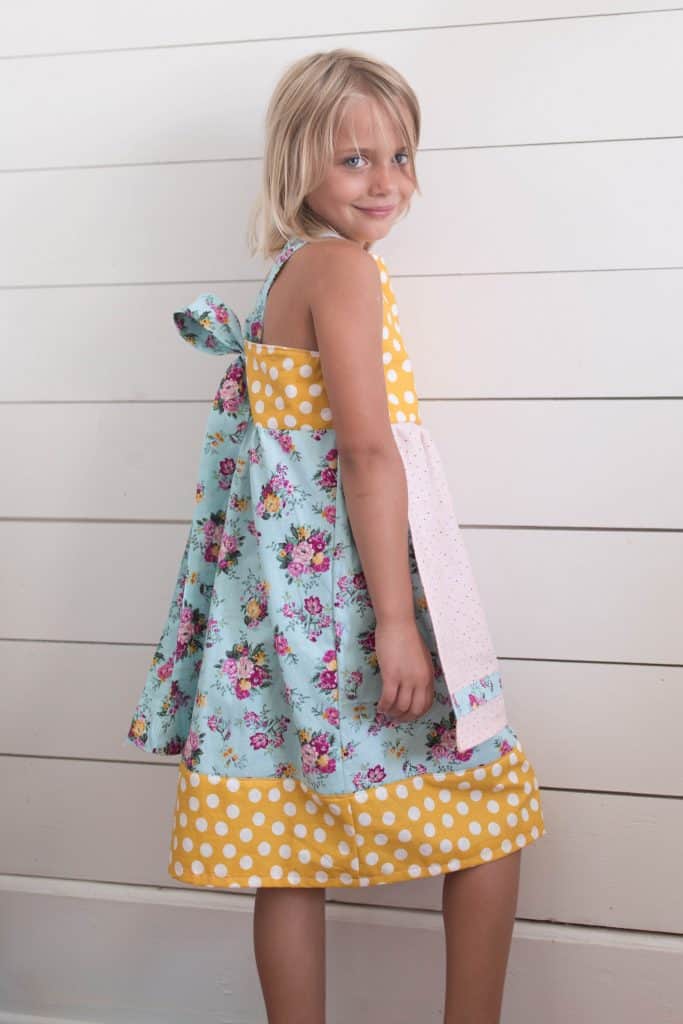
Today I’m going to show you how I make one of my favorite dress styles for girls, that I call “Bow in the Back Dress”.
It is perfect for summer with flip flops, or worn over a long sleeve shirt and leggings for the fall. My girls wear dresses like this year round.
I have included all the measurements from my experience making this for every size from 2T to 10.
Easy Girls Dress Sewing Tutorial Cut list
The best fabric choices for this dress are quilter’s cotton, linen and corduroy. Don’t use anything stretchy, like a knit for this project.
2T Size
Bodice cut 2 (one from the main fabric and one from the lining fabric)- 5.5″ long by 11.5″ wide
Back bodice cut 2 (one from the main fabric and one from the lining fabric)- This will just be the length from the bottom of the armpit to the bottom of the front bodice, and the same width as the front bodice. Use the front bodice as a guide to cut this piece. (Refer to video if this is confusing.)
Skirt pieces cut 2- 12.5″ long by 18″ wide
Straps cut 2- 33″ long by 3″ wide
The finished dress length from top of front bodice to hemline should be 16″ long.
Optional add ons
Bodice embellishment stripes
Apron- Cut 1- 9″ long by 12″ wide
Stripe to go across apron- 12″ long by 1.5″ wide
Band around the bottom in a coordinating fabric- 5.5″ by 18″ (decrease skirt length above by 4″)
3T Size
Bodice cut (one from the main fabric and one from the lining fabric) 2- 6″ long by 12″ wide
Back bodice cut 2 (one from the main fabric and one from the lining fabric)- This will just be the length from the bottom of the armpit to the bottom of the front bodice, and the same width as the front bodice. Use the front bodice as a guide to cut this piece. (Refer to video if this is confusing.)
Skirt pieces cut 2- 14″ long by 19″ wide
Straps Cut 2- 33″ long by 3″ wide
The finished dress length from top of front bodice to hemline should be 18″ long.
Optional add ons
Bodice embellishment stripes
Apron Cut 1- 10.5″ long by 13″ wide
Stripe to go across apron- 13″ long by 1.5″ wide
Band around the bottom in a coordinating fabric- 5.5″ by 19″ (decrease skirt length above by 4″)
4T Size
Bodice cut 2 (one from the main fabric and one from the lining fabric)- 6.5″ long by 12.5″ wide
Back bodice cut 2 (one from the main fabric and one from the lining fabric)- This will just be the length from the bottom of the armpit to the bottom of the front bodice, and the same width as the front bodice. Use the front bodice as a guide to cut this piece. (Refer to video if this is confusing.)
Skirt pieces cut 2- 15.5″ long by 20″ wide
Straps Cut 2- 34″ long by 3.5″ wide
The finished dress length from top of front bodice to hemline should be 20″ long.
Optional add ons
Bodice embellishment stripes
Apron- Cut 1- 12″ long by 14″ wide
Stripe to go across apron- 14″ long by 1.5″ wide
Band around the bottom in a coordinating fabric- 6″ by 20″ (decrease skirt length above by 4.5″)
5T Size
Bodice cut 2 (one from the main fabric and one from the lining fabric)- 7″ long by 13″ wide
Back bodice cut 2 (one from the main fabric and one from the lining fabric)- This will just be the length from the bottom of the armpit to the bottom of the front bodice, and the same width as the front bodice. Use the front bodice as a guide to cut this piece. (Refer to video if this is confusing.)
Skirt pieces cut 2- 17″ long by 21″ wide
Straps Cut 2- 35″ long by 3.5″ wide
The finished dress length from top of front bodice to hemline should be 22″ long.
Optional add ons
Bodice embellishment stripes
Apron- Cut 1-13.5″ long by 15″ wide
Stripe to go across apron- 15″ long by 2″ wide
Band around the bottom in a coordinating fabric- 6″ by 20″ (decrease skirt length above by 4.5″)
6X Size
Bodice cut 2 (one from the main fabric and one from the lining fabric)- 7.5″ long by 13.5″ wide
Back bodice cut 2 (one from the main fabric and one from the lining fabric)- This will just be the length from the bottom of the armpit to the bottom of the front bodice, and the same width as the front bodice. Use the front bodice as a guide to cut this piece. (Refer to video if this is confusing.)
Skirt pieces cut 2- 18.5″ long by 22″ wide
Straps Cut 2- 36″ long by 4″ wide
The finished dress length from top of front bodice to hemline should be 24″ long.
Optional add ons
Bodice embellishment stripes
Apron- Cut 1- 15″ long by 16″ wide
Stripe to go across apron- 16″ long by 2″ wide
Band around the bottom in a coordinating fabric- 6.5″ by 22″ (decrease skirt length above by 5″)
Girls Size 7
Bodice cut 2 (one from the main fabric and one from the lining fabric)- 8″ long by 14″ wide
Back bodice cut 2 (one from the main fabric and one from the lining fabric)- This will just be the length from the bottom of the armpit to the bottom of the front bodice, and the same width as the front bodice. Use the front bodice as a guide to cut this piece. (Refer to video if this is confusing.)
Skirt pieces cut 2-20″ long by 23″ wide
Straps Cut 2- 37″ by 4″
The finished dress length from top of front bodice to hemline should be 26″ long.
Optional add ons
Bodice embellishment stripes
Apron- Cut 1- 17″ wide by 14.5″ long
Stripe to go across apron- 17″ long by 2.5″ wide
Band around the bottom in a coordinating fabric- 6.5″ by 23″ (decrease skirt length above by 5″)
Girls Size 8/10
Bodice cut 2 (one from the main fabric and one from the lining fabric)- 8.5″ long by 14.5″
Back bodice cut 2 (one from the main fabric and one from the lining fabric)- This will just be the length from the bottom of the armpit to the bottom of the front bodice, and the same width as the front bodice. Use the front bodice as a guide to cut this piece. (Refer to video if this is confusing.)
Skirt pieces cut 2- 21.5″ long by 24″ wide
Straps Cut 2- 38″ long by 5″ wide
The finished dress length from top of front bodice to hemline should be 28″ long.
Optional add ons
Bodice embellishment stripes
Apron- Cut 1- 18″ long by 18″ wide
Stripe to go across apron- 18″ long by 2.5″ wide
Band around the bottom in a coordinating fabric- 7″ by 24″ (decrease skirt length above by 5.5″)
Easy Girls Dress Sewing Tutorial Instructions
Cut all the pieces from the cut list.
Also, cut out any of the optional add ons if you want to add them.
Prepare the strap pieces.
- On one short end of a strap piece, press over ½” toward the “wrong side” of the fabric.
- Fold the strap piece in half all the way down the long side, right sides together, and sew a ¼” seam. Leave the two ends open at this point, including the short end that’s folded over.
- Using a large safety pin at one corner, turn the strap right side out.
- Press the seam flat.
- Topstitch all along the two long sides and the folded short side, with a very narrow seam.
- Repeat with the other strap piece.
Prepare the bodice and add the straps.
(Watch the video above for more visual instructions on this.)
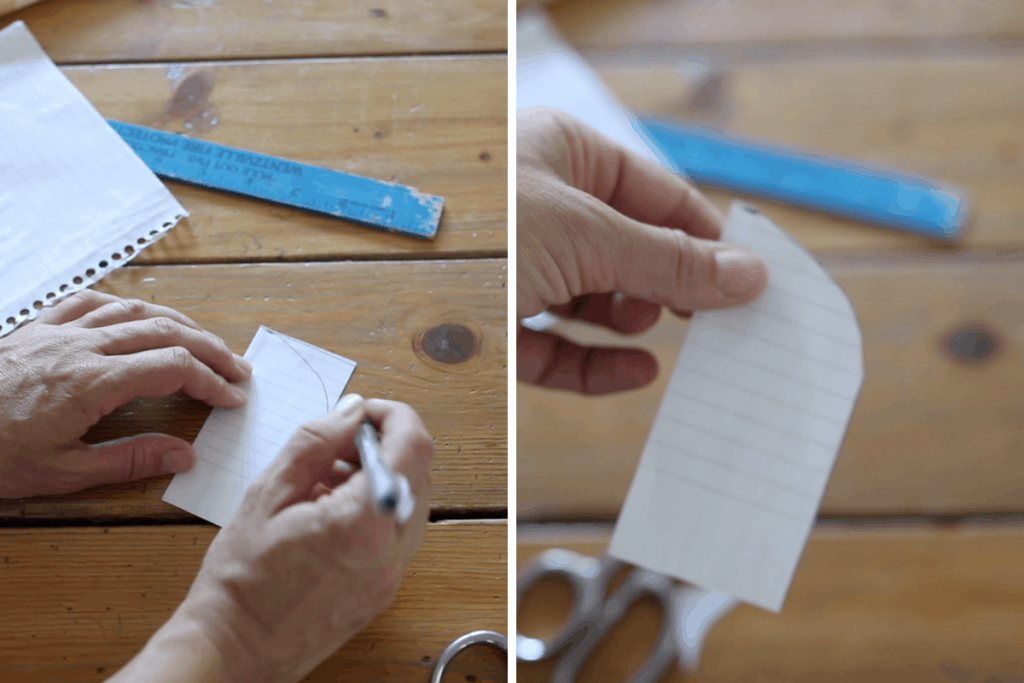
- With a small piece of paper or scrap fabric, but a rectangle 2″ by 4″. Now draw curved line to round off one edge of the piece. (Refer to the photo below.) This will be your pattern piece to create arm hole areas on the bodice. Fold one bodice piece in half with right sides together. Line up your little patter piece with the outside and top edges of the bodice. Cut around the pattern piece.
- With right sides together sew the main bodice piece to the main back band piece, at the side seams.
- Repeat with the lining fabric.
- Place the sewn main fabric bodice piece inside the sewn lining fabric bodice piece, with right sides together.
- Place the un-sewn strap at one edge of the top part of the bodice, in between the two layers and pin in place.
- Repeat with the other strap.
- Sew around the neckline, arm pieces and back, leaving the bottom open. Make sure to catch the ends of the straps while you’re sewing. Turn the bodice right side out, press and topstitch.
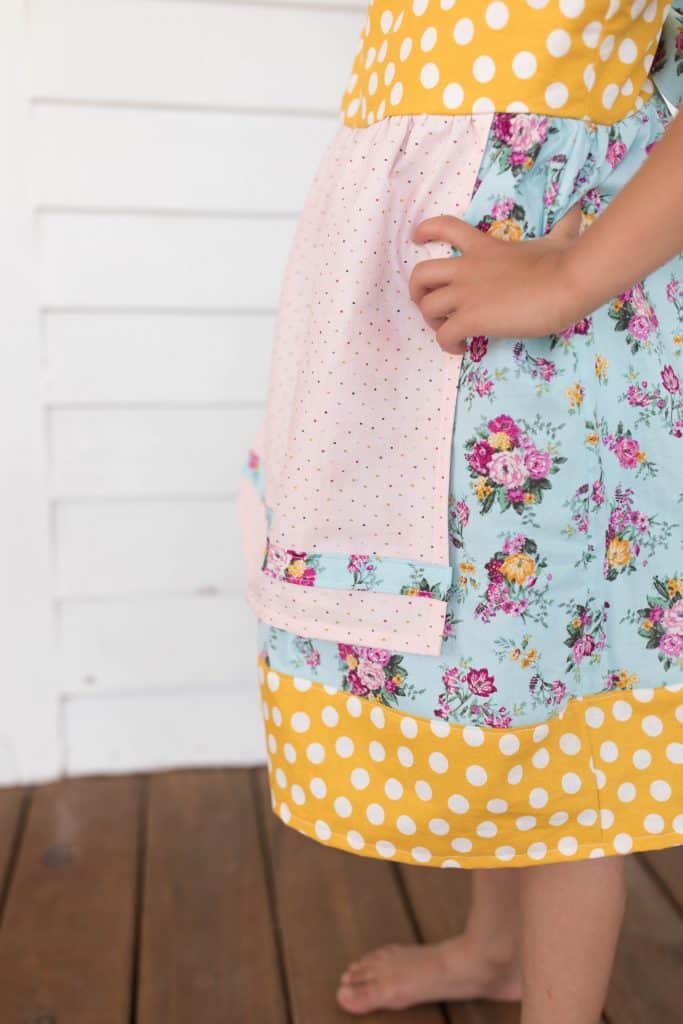
Make the apron. (optional)
If you decided to make the apron, you need to sew it before attaching the skirt.
- First, add the strip across the bottom of the apron, if desired. To do this fold the top over to the wrong side of the fabric 1/2″ and press. Repeat with the bottom of the fabric strip. Sew it to the apron approximately 5″ from the bottom.
- Hem 3 edges of the apron by folding the raw edge under 1/2″ and then another 1/2″ Press in place and sew with a 3/8″ seam.
Add the skirt.
- Add the apron to the skirt. (optional) Fold one of the skirt pieces in half to find the middle, and mark it with a pin. Fold the apron piece in half to find the middle, and mark it with a pin. Line up the two pins and sew the apron to the skirt piece, with the right side of the apron piece facing out, and the wrong side facing the right side of the skirt piece. (This is one of the very few times in sewing where you’re not sewing right sides together!) Make sure the apron is centered.
- With right sides together, sew the two skirt pieces together at the side seams.
- Sew a gathering stitch in the top of the skirt piece. (This will gather the apron also, if you decided to add it.)
- Pull the gather strings until the size of the skirt piece matches the bottom of the bodice.
- Pin the skirt to the bodice with right sides together, and sew in place with a 3/8″ seam.
- Use a zigzag stitch or serger to finish the seam.
- (optional) If you have decided to add a bottom band for a little extra color and pattern (this could also be a ruffle!) sew the two pieces together with right sides together at the side seams. Lie the top of the band piece up with the bottom of skirt, making sur to match the side seams. Sew it in place with a 3/8″ seam.
- Hem the skirt. Press the bottom of the skirt over 1/2″ and then another 1/2″ toward the inside of the skirt. Sew all the way around with a 3/8″ seam.
Add the buttonholes.
Refer to my video to learn how to use a button hole foot to make buttons. I promise this sounds way scarier than it actually is!
Shop the fabrics
Mustard Polka Dot
Floral Fabric
Pink Polka Dot
Try it on your girl and enjoy!

Pin it for later


Made this for my granddaughter. Just love it! Thanks so much for the instructions.
I just finished making this in size 6 for my 6 year old and it’s perfect!!!! She is a stick so I added a bit of elastic on the back sides to cinch the waist just a bit. Beautiful dress and very easy. The video helped a lot. My daughter loves it and is begging me for another one. Thank you very much for sharing this pattern (and in so many sizes too.)
Awesome! I am so glad to hear this!
Thank you so much for the instructions and tutorial on the “bow in the back” dress. I made one for my granddaughter today and I plan to use the pattern to make more.
Your pretty “almost-10-year-old” looks just like her lovely mommy! The dress you made is precious. I totally get your love of sewing. I started at around age 7 (many, many years ago!) when mom began teaching me on her old black, straight-stitch-only White brand rotary machine. I LOVED it and never looked back. Now I sew on a big electronic machine making everything from underwear to dresses to quilts to slipcovers and dog beds (plus all kinds of things in between!) Two years ago I was blessed with a great-granddaughter and now I’m having a wonderful time making pretty things for her.
Considering you work “from scratch” so to speak, the results are beautiful. You are VERY talented.
You are also a terrific mom and homemaker. The way you take care of your home and family is amazing. I admire your devotion to them and wish I had your kind of energy still. I just hope you manage to find a little time for YOU as well. A very wise person once told me, “In order to take care of them, you MUST take care of yourself”. It’s true.
You go girl, and God bless you and yours always.
Thank you so much for the amazing tutorial! I haven’t sewed in years, but was able to sew my daughter the bow-back dress! She loves it and I’m excited to get started on a second dress! Thank you!
Hi. I just love the dress pattern for the little girls. I have watched your video tutorial. You said there is a sheet to print out for measurements and etc. I can’t seem to find it. Can you tell me where to look. Thanks, Joyce
Hi! love the dress. I have three boys and would love to sew them some clothes if you have any ideas?! 🙂
If these are all from when you knew nothing but pin cushions … you are one talented lady! Cute, cute, cute dresses … all! Even cuter kiddos! I sewed a lot when the girls were small … had to stop later as back troubles caused me pain when working at my sewing machine. I agree that it nourishes your creativity, so I was lucky to be able to find other outlets!
Love your calm and nourishing lifestyle, and I’m learning a lot from you, dear, while enjoying my “grandma/Grammy to 15 kiddles” years!”
Wow! Grammy to 15?! Thats awesome. I bet you stay busy as well! 🙂
LOVE LOVE You make me miss sewing. I used to make all the dresses for my twin girls (still have most of them). They are now 28 LOL Waiting on a someday grandbaby. Thanks for sharing. You’re so sweet and talented!
Aww wow! I don’t like getting rid of the handmade dresses either. I usually pass them down to my niece and then my sister stores them in her basement! Haha.
I taught myself to sew when I had my first daughter (also at 23) and I went a little crazy too – especially after having another daughter and the matching ?! 5 kids later I still love sewing. Creating is a near spiritual experience and makes me feel the most fulfilled. Love your blog.