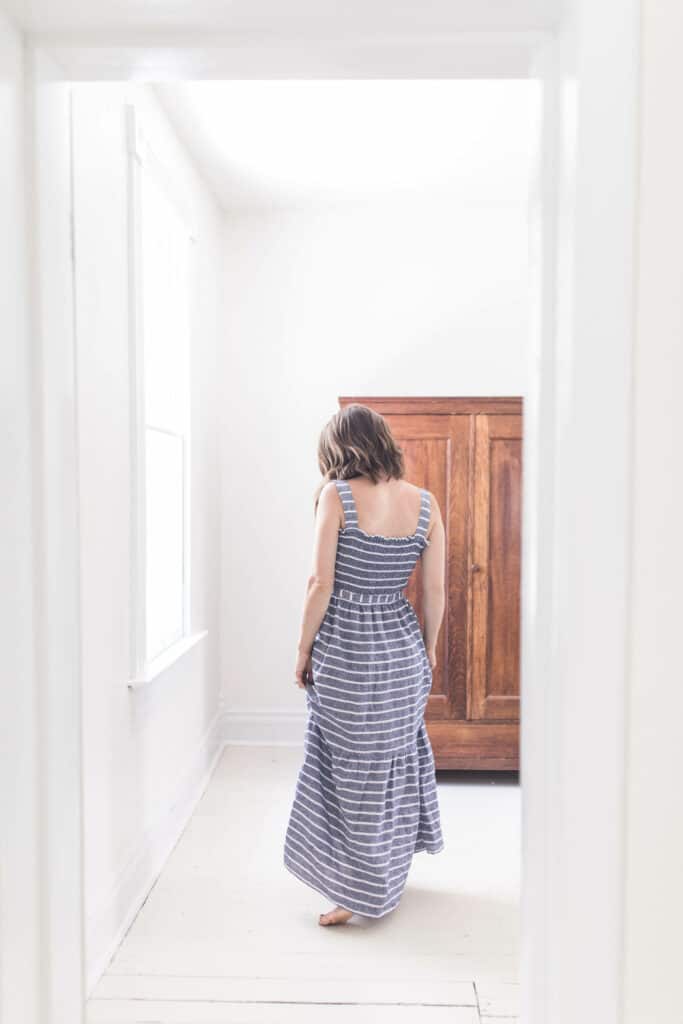
Learn how to make a simple, DIY summer dress that is great for beginners. This shirred dress is perfect for summer, and even makes a great maternity dress! Follow my tips below to make this simple shirred dress.

This post contains affiliate links, which means I make a small commission at no extra cost to you. See my full disclosure here.
Today I’m going to show you how to make an easy DIY maternity dress (or regular dress! It doesn’t have to be maternity, but that is the stage of life we are currently in). But I’m really excited to show you one of my favorite sewing techniques: shirring.
If you are completely new to sewing, check out my Simple Sewing Series to get started.
This is something that I haven’t done in a long time. When my older girls, who are now 10 and 8, were small, I would use this technique all the time. I first learned about it somewhere in internet land.
Shirring is basically when you sew a garment using elastic thread to bunch together some fabric to create a super easy waistband or bodice. Anytime you do something stretchy with elastic, you have a lot of room for error, which is perfect if you are new to sewing.
If you want, you can do this in just the back of the dress. I have a dress that I wear a lot on Instagram that has shirring in the back and buttons in the front. It is an easy way to create that flexibility without seeing the shirring all the way around .
You may notice many garments you own, or garments your kids have, probably have some shirring. In sewing, it creates a very forgiving piece, which is great if you are brand new to making clothing.
Ok, so let’s get started making this simple shirred dress!

DIY Summer Dress Materials:
- 2.5 yards of fabric- I used a linen blend, but any cotton or cotton-linen blend will work. Choose a light to medium weight fabric that isn’t stretchy.
- Elastic thread
- Iron
- Regular thread
- Sewing machine
- Pins
- Measuring tape
- Scissors
Shop the supplies
Denim/white striped linen
Another great linen option is anything by the Robert Kauffman brand linen blend. I love them all, but here are a few notable favorites: HERE and HERE
elastic thread
Basic sewing machine
Bobbins and tape measure
Straight pins
All purpose thread
Universal needles
Sewing scissors
Steam iron
OPTIONAL: Serger
DIY Summer Dress – Shirred Dress Tutorial Video
DIY Summer Dress- Shirred Dress Tutorial
Take Measurements
You are going to need a few measurements to make this DIY summer dress.
2 pieces for the main piece, two pieces for the ruffle, two pieces for the straps,
First take a measurement of the bust at the widest point. Multiple that by 1.5, and add 2 inches. The 2 inches is for seam allowance, and the 1.5 is to shrink it down with the elastic thread.
For the length: go under your armpit and go to where you want the dress to lay. I’m not going to make mine super long, because I’m going to add a ruffle to the bottom. You could also not make yours maxi length. I’m going to do mine maxi length to hide those varicose veins I get during pregnancy.
If you are just doing the dress without the ruffle, you will want to add an inch to the top and and inch to the bottom for hem allowance, so a total of two extra inches to your length.
For the ruffle width, you want to do 1.5 times the width you got for the main dress piece. And of course, measure the length that you want to hang down, then add an inch for hem allowance.
For the straps, measure from under your armpit to where you want the strap to hit in the back, and add a half inch on each end (so 1 inch total) for seam allowance. I like to make the straps 4 inches wide so I can fold them in half and have that hem in there.
DIY Summer Dress Notes:
I’m going to share with you my measurements. If you are similar in size to me, I’m 5’5″ and wear a size small. These measurements could work for you. You may have to take some off the bottom or add some depending if you are shorter or taller. The shirring makes this very flexible.
Now, I’m not going to carry my shirring very far down because of my bump. If you are not pregnant, you could take the shirring down a little farther.

Cut out the fabric:
I’m cutting two pieces for the main part: 27 inches wide by 30 inches long
I’m cutting the ruffle 40 inches wide by 19 inches long
The straps are being cut 4 inches wide by 18 inches long.
Sew The DIY Summer Dress Together:
After you get all the pieces cut out, the next step is to get as much sewing done as possible before doing the elastic thread.
- Sew the side seams for both ruffles and both of the main side seams. To do this, you take the two main pieces, put right sides together, and sew a 1/2 inch seam down both sides. I did the same for the ruffle piece. Finish off the seams with a zig zag stitch or a serger.
- Put a hem in the ruffle piece. I folded the ruffle piece under about half inch, folded it another half inch, and then sewed all the way around. If you are brand new to sewing, check out the simple sewing series that shows you how to sew a side seam and hem.
- Put in the gathering stitch to the top of the ruffle piece. You do this by raising the stitch length as high as the machine will go, and raise the tension as high as it will go. Now when you do that, and you push the ruffle through the gathering stitch it pulls and ruffles it automatically. It is a very easy way to make ruffles. You will have to do some adjusting later. You can find how to sew a ruffle in my simple sewing series.
Sew the straps
- Fold the strap pieces in half, right sides together. Sew a narrow seam down the long edge. Turn it out with a safety pin. Press it flat with the seam in the back middle. Put two top stitches down both long sides, and then repeat this process for the other strap.
- Put a narrow hem on the top piece. To do this I just folded the top under 1/4 inch and then another 1/4 inch and then sewed it around. I did this more narrow because I don’t want a big bulky hem at the top.

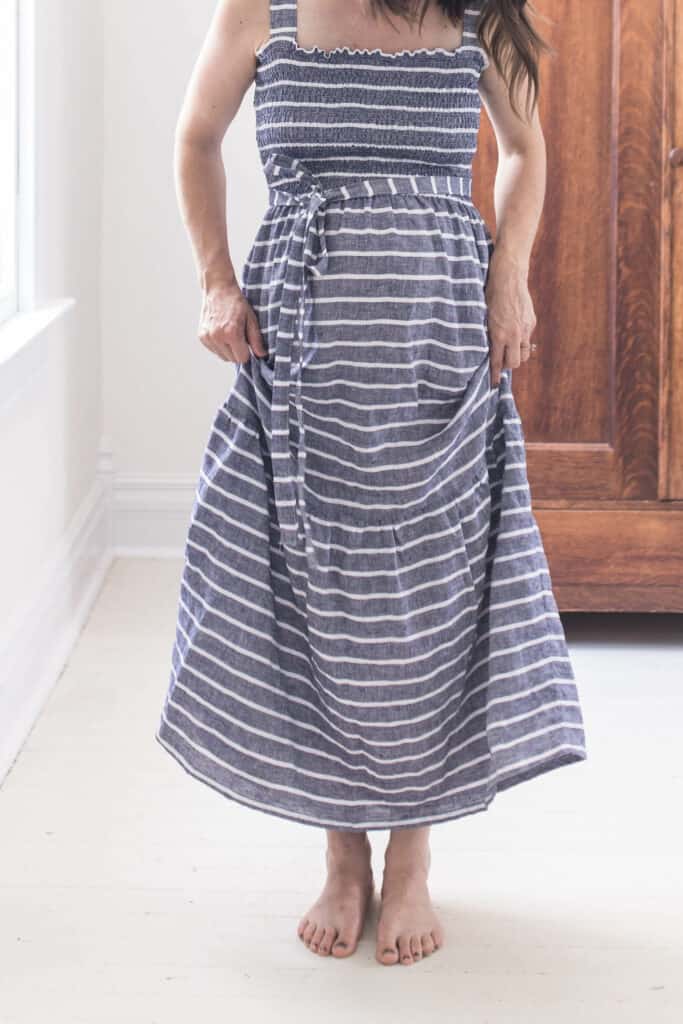
How To Sew Shirring To Create A Shirred Dress
Now that we’ve done all the stitching with the regular thread we are going to do the shirring with the elastic thread.
- Wind the bobbin. I usually do this by hand because the elastic does stretch, and using the machine to wind the bobbin may stretch it out too much. Just take an empty bobbin and wrap the elastic thread around it. You want to gently wrap it, making sure you are not stretching the elastic thread at all. Pulling and stretching the thread may make our top gather too much.
- You will have to refill the bobbin multiple times during this process. You can also by pre-shirred fabric at fabric stores.
- Load the bobbin into your sewing machine. I like to pull the thread out the back of the machine to make sure it is all okay.
- Put the fabric with the dress face up, because you want the elastic to hit the wrong side of the fabric, not the right side. You will also want to raise the stitch length. I did mine as high as it would go. This helps the thread gather a little better.
- Start running the dress through your machine, starting at the top of the hem stitch (remember, you want the elastic thread to be on the back side and the regular thread on the top).
- Go all the way around the top of the dress. When you’ve gone all the way around, lift up the presser foot and shift over your fabric down to the next row you are about to sew. Start sewing until the new hem lines up and is equal distance away from the other hems.
- I like to move to the next row in the same spot in each row.
- The way shirring works is you just sew around and around and around, as it pulls it in. You don’t want to start and stop.
Tips For Sewing A Shirred Dress
- Don’t worry if you notice it’s not gathering like you want it to. It will take a few rows of sewing before it really starts to gather. Even if you get to the end and it didn’t gather as much as you would have liked, there are tricks to fix that.
- The further you space out your rows of elastic, the less bunched up it will be; the closer together, the more bunched up.
- If you are creating the shirring and thinking it doesn’t look good and your rows aren’t spaced evenly, don’t worry. Once you iron and wash the dress, you won’t be able to tell.
- Go down as far as you want with the shirring.
- Using a striped fabric can help you make straighter lines.
- When the bobbin ends, I like to just do a front and back stitch and then pop in the next bobbin. You could always tie a little knot to attach the elastic thread together.
Attach the ruffle
- Once the shirring is done, lay the top piece on the ground, and slide the ruffle piece onto the main piece, right sides together. Pull the gathers out on the ruffle piece until the width of the main piece is the same length as the width of the ruffle.
- Pin it in place and sew all the way around with regular thread. Zig zag stitch that open seam.
- After you get all the shirring in, iron the shirring stitches with a hot iron with steam. This will help shrink everything up even more! After you have it all ironed, you can throw it in the washer and dryer because it will really shrink it down, and I wanted to know where everything was so I knew where to apply my straps.
Sew On The Straps
- Try it on to see where you want the straps to hit, and then just sew them on the front and the back.
- Once I had the straps put on, I decided to make a waistband.
To make the waistband, I just cut a very long strip from some of the extra fabric and made it 3 inches wide, and made it the same way as the strap: folding it in half and sewing a seam along the long edge, then turning it right side out, ironing it, and then top stitching.
This dress is so versatile, and can be used for a maternity dress, regular dress, or kids dresses. It’s so simple and easy.
That’s it! This shirred dress is so simple to make. I’ve been loving this lightweight DIY maternity dress for the summer. Basically, dresses have become my staple maternity wardrobe.
Check out more of our favorite sewing projects:
THE SIMPLE SEWING SERIES
Brand new to sewing? Check out my free sewing course: The Simple Sewing Series
There you will find video tutorials to walk you through every step to get you going on learning how to sew! We cover EVERYTHING from how to thread a machine, to creating a simple hem and seam. When you “graduate” from the course, you will find easy projects for every room in your home!
I’m passionate about teaching others to create beautiful things for their home. I hope you join me over on this page: The Simple Sewing Series
Pin It For Later


An oldie but a goodie! I just made my third dress using this tutorial, and it’s actually my first for maternity use. My first two carried the shirring down farther than I prefer with a bump. I was at the store getting fabric for a quilt backing and saw a bolt of bright printed double gauze. I’m going to a wedding this weekend and nothing fits the 34 week bump quite right. Fast forward about 4 hours and I have a finished dress! Only recommendation I have is to add pockets, which I did after the fact to my second version of this dress. Not terribly complicated, but does involve unpicking the side seams (which can be more difficult if you serged them.
I chuckled this morning when I opened my email and saw one from you talking about you’re good intentions to sew a few dresses, but it hadn’t happened this year. I started this dress about a year ago, just before heading from unusually hot Alaska to unseasonably more hot and humid than normal Ohio for 2 weeks, about 25 weeks pregnant with twins. I got stuck on the shirring, intimidated by the shirring, and the dress is still sitting, half-made, with my sewing stuff 😂
I’m a little confused on finishing the top of the dress. Is it step 2 of Sew the Straps? I figured that was for the straps but is it for the top of the dress?
I just made this for my 10-month-old, and it is so cute! I plan to make myself one too, but I thought I’d try it in a mini size to make sure it turned out well before investing in fabric for the adult one.
Hi Lisa,
I’m about to try this project out for myself and 2 daughters. After you take the bust measurement in the way that you described (“First take a measurement of the bust at the widest point. Multiple that by 1.5, and add 2 inches. The 2 inches is for seam allowance, and the 1.5 is to shrink it down with the elastic thread.”) Do you then divide this number in half to get the two pieces that you describe? I’m trying to figure out how you got 27” wide as your measurement. Thank you for the clarification.
Best,
I noticed this too. Yes, you either only measure the bust to your armpits or measure all the way around and divide in half.
Thanks so much for the tutorial! Do you remember how much shirring elastic you used? I have 30 metres. Wondering if it’ll be enough. xx
How would i make this for 5t? I really want to make it for my daughter!
I love this diy shirred dress for the summer. So beautiful and fitted on top and loose and flowing on the bottom. Thanks for the dress tutorial!
This was such a great tutorial! I have never shirred anything, but used to buy the shirred tube tops and add skirts to them for maternity dresses. I have been wanting to make a tutorial for a dress on my blog, but thought I needed to somehow make a printable pattern or something for people! You set my mind at ease and I see now that I don’t have to do that! I am not a pattern person, so it was going to be a stretch to make one! Thanks for this!